作者Talent•C
转载请注明出处
前言
今天我们再来学习一种 ListView 升级版的 RecyclerView。在过去的Android开发中 ListView 贡献卓越,直到今天还有不计其数的程序在使用着,不过 ListView 并不是完全没有缺点的,比如说如果我们不使用一些技巧来提升它的运行效率,那么 ListView 的性能就会非常差。还有, ListView 的拓展性也不好, 它只能实现数据纵向滚动的效果,如果我们想实现横向滚动的话, ListView 是无法实现的。为此,Android提供了更加强大的的滚动控件—RecyclerView,它不仅可以实现和 ListView 同样的效果,还优化了 ListView 中存在的各种不足之处,目前Android官方更加推荐使用 RecyclerView。
我们创建一个 RecyclerViewTest 工程,演示一下。
RecyclerView基本用法
RecyclerView 的基础用法与 ListView 很相似,也是需要一个子项布局用来展示数据,需要一个数组用来保存数据,同样也需要一个适配器为子项布局填充数据。
第一步,添加控件
RecyclerView 与百分比布局类似也属于新增的控件,Android团队也是定义在了 support 库中,首先第一步,打开项目的 build.gradle 中添加对应依赖。
打开 “app/build.gradle” 这个文件,在 dependencies() 中修改如下:
1 2 3 4 5 6 7 8 9 10
| dependencies { compile fileTree(dir: 'libs', include: ['*.jar']) androidTestCompile('com.android.support.test.espresso:espresso-core:2.2.2', { exclude group: 'com.android.support', module: 'support-annotations' }) compile 'com.android.support:appcompat-v7:25.3.1' compile 'com.android.support.constraint:constraint-layout:1.0.2' compile 'com.android.support:recyclerview-v7:24.2.1' testCompile 'junit:junit:4.12' }
|
添加完成后,点击 Sync now 进行同步,然后就可以在活动中添加使用这个控件了。
我们在项目的 MainActivity 中添加两个按钮, 分别用于启动活动并展示横向滚动的 RecyclerView 和 纵向滚动的 RecyclerView。
新建一个活动 RecyclerActivity 用来展示横向滚动的 RecyclerView 和 纵向滚动的 RecyclerView。
在其布局文件中添加 RecyclerView 控件
1 2 3 4 5 6 7 8 9 10 11 12 13
| <?xml version="1.0" encoding="utf-8"?> <LinearLayout android:id="@+id/rec_root" xmlns:android="http://schemas.android.com/apk/res/android" android:layout_width="match_parent" android:layout_height="match_parent" android:orientation="vertical"> //添加 RecyclerView 控件 <android.support.v7.widget.RecyclerView android:id="@+id/RecyclerV_1" android:layout_width="match_parent" android:layout_height="match_parent"> </android.support.v7.widget.RecyclerView> </LinearLayout>
|
因为这个控件是在 support 库中的,所以要按照这种方式使用,之前讲布局的时候就已经说过了,这里不再说了。
第二步,创建子项布局
创建一个 RecyclerView 子项布局文件 recycler_item_style1.xml
1 2 3 4 5 6 7 8 9 10 11 12 13 14 15 16
| <?xml version="1.0" encoding="utf-8"?> <LinearLayout xmlns:android="http://schemas.android.com/apk/res/android" android:layout_width="match_parent" android:layout_height="wrap_content" android:orientation="horizontal"> <ImageView android:id="@+id/rec_style1_img" android:layout_width="wrap_content" android:layout_height="wrap_content" /> <TextView android:id="@+id/rec_style1_text" android:layout_width="wrap_content" android:layout_height="wrap_content" android:layout_gravity="center_vertical" android:layout_marginLeft="10dp"/> </LinearLayout>
|
这里我们同样也是展示左侧图片,右侧文字。
第三步,创建数据模型及适配器
创建数据模型,代码如下
1 2 3 4 5 6 7 8 9 10 11 12 13 14 15
| public class DataModel { private int pid; private String text; public DataModel(String str, int imgId) { this.pid = imgId; this.text = str; } public int getPid() { return pid; } public String getText() { return text; } }
|
数据模型对象包含两个属性分别是 图片id(图片在drawable文件夹下名字,有系统自动处理)和图片对应的文字。
创建适配器,代码如下
1 2 3 4 5 6 7 8 9 10 11 12 13 14 15 16 17 18 19 20 21 22 23 24 25 26 27 28 29 30 31 32 33 34 35 36 37 38 39 40 41 42 43 44 45 46 47 48 49 50 51
| package com.recyclerviewtest.chuliangliang.recyclerviewtest; import android.support.v7.widget.RecyclerView; import android.view.LayoutInflater; import android.view.View; import android.view.ViewGroup; import android.widget.ImageView; import android.widget.TextView; import java.util.List; * */ public class DataModelAdapter01 extends RecyclerView.Adapter<DataModelAdapter01.ViewHolder_style1> { private List<DataModel> mDataArray; static class ViewHolder_style1 extends RecyclerView.ViewHolder { ImageView imageView; TextView textView; public ViewHolder_style1(View view) { super(view); textView = (TextView) view.findViewById(R.id.rec_style1_text); imageView = (ImageView) view.findViewById(R.id.rec_style1_img); } } public DataModelAdapter01(List<DataModel> dataList) { mDataArray = dataList; } @Override public ViewHolder_style1 onCreateViewHolder(ViewGroup parent, int viewType) { View view = LayoutInflater.from(parent.getContext()).inflate(R.layout.recycler_item_style1,parent,false); ViewHolder_style1 vHolder = new ViewHolder_style1(view); return vHolder; } @Override public void onBindViewHolder(ViewHolder_style1 holder, int position) { DataModel dataModel = mDataArray.get(position); holder.imageView.setImageResource(dataModel.getPid()); holder.textView.setText(dataModel.getText()); } @Override public int getItemCount() { return mDataArray.size(); } }
|
上面的代码看上去有点长,但其实他比 ListView 的适配器更容易理解,如果学过iOS的小伙伴,会发现它与 UITableView 的几个代理类似。我们在适配器内定义一个内部类 ViewHolder_style1 继承自 RecyclerView.ViewHolder,然后在这个内部类的构造方法中传入一个 View 的参数,这个参数就是 RecyclerView 子项的最外层布局(可以理解为cell),那么我们就可以用过 findViewById() 方法获取布局中的 ImageView 和 TextView 控件的实例了。
再往下看适配器 DataModelAdapter01 继承自 RecyclerView.Adapter, 那么就需要重写 onCreateViewHolder() 、onBindViewHolder() 和 getItemCount() 方法, 每个方法的作用我在上面都已经注释过了就不再重复了。
现在所有东西都已经准备齐全了,我们开始拼装吧,打开 RecyclerActivity 作如下修改:
1 2 3 4 5 6 7 8 9 10 11 12 13 14 15 16 17 18 19 20 21 22 23 24 25 26 27 28 29 30 31 32 33 34 35 36 37 38 39 40 41 42 43 44 45 46 47 48 49 50 51 52 53 54 55 56 57 58 59 60 61 62 63 64 65 66 67 68 69 70 71 72 73 74 75 76 77 78 79 80 81 82 83
| package com.recyclerviewtest.chuliangliang.recyclerviewtest; import android.content.Context; import android.content.Intent; import android.support.v7.app.AppCompatActivity; import android.os.Bundle; import android.support.v7.widget.LinearLayoutManager; import android.support.v7.widget.RecyclerView; import java.util.ArrayList; import java.util.List; public class RecyclerActivity extends AppCompatActivity { private List<DataModel> mDatalist = new ArrayList<DataModel>(); * 定义两个常量 用来标记 RecyclerView 滑动方向 **/ final static int REC_VERTICAL = 200; final static int REC_HORIZONTAL = 300; private int scrollToOrientation = REC_VERTICAL; public static void StartRecyclerActivity(Context ctx, int orientation) { Intent intent = new Intent(ctx,RecyclerActivity.class); intent.putExtra("Orientation",orientation); ctx.startActivity(intent); } @Override protected void onCreate(Bundle savedInstanceState) { super.onCreate(savedInstanceState); setContentView(R.layout.activity_recycler); Intent intent = getIntent(); this.scrollToOrientation = intent.getIntExtra("Orientation",REC_VERTICAL); this.initData(); RecyclerView recyclerView = (RecyclerView)findViewById(R.id.RecyclerV_1); LinearLayoutManager linearLayoutManager = new LinearLayoutManager(this); switch (this.scrollToOrientation){ case REC_HORIZONTAL: { linearLayoutManager.setOrientation(LinearLayoutManager.HORIZONTAL); } break; case REC_VERTICAL: { linearLayoutManager.setOrientation(LinearLayoutManager.VERTICAL); } break; } DataModelAdapter01 adapter = new DataModelAdapter01(mDatalist); recyclerView.setLayoutManager(linearLayoutManager); recyclerView.setAdapter(adapter); } public void initData() { for (int i = 0; i< 2; i ++) { DataModel dataModel_cm = new DataModel("草莓",R.drawable.cm); mDatalist.add(dataModel_cm); DataModel dataModel_cz = new DataModel("橙子",R.drawable.cz); mDatalist.add(dataModel_cz); DataModel dataModel_pg = new DataModel("苹果",R.drawable.pg); mDatalist.add(dataModel_pg); DataModel dataModel_pt = new DataModel("葡萄",R.drawable.pt); mDatalist.add(dataModel_pt); DataModel dataModel_xj = new DataModel("香蕉",R.drawable.xj); mDatalist.add(dataModel_xj); DataModel dataModel_yt = new DataModel("樱桃",R.drawable.yt); mDatalist.add(dataModel_yt); } } }
|
上述代码看着是不是很眼熟,没错是的,与上篇文章中 ListView 的用法一样,只是我们多加了几行代码,使用了 LinearLayoutManager 来控制滑动方向,怎么样?是不是很简单就可以实现横向滑动。我们在 MainActivity 中为两个按钮添加点事件,代码如下
1 2 3 4 5 6 7 8 9 10 11 12 13 14 15 16 17 18 19 20 21 22 23 24 25 26 27 28 29 30 31 32
| package com.recyclerviewtest.chuliangliang.recyclerviewtest; import android.content.Intent; import android.support.v7.app.AppCompatActivity; import android.os.Bundle; import android.support.v7.widget.RecyclerView; import android.view.View; import android.widget.Button; public class MainActivity extends AppCompatActivity { @Override protected void onCreate(Bundle savedInstanceState) { super.onCreate(savedInstanceState); setContentView(R.layout.activity_main); Button vButton = (Button)findViewById(R.id.button_1); vButton.setOnClickListener(new View.OnClickListener() { @Override public void onClick(View v) { RecyclerActivity.StartRecyclerActivity(MainActivity.this,RecyclerActivity.REC_VERTICAL); } }); Button hButton = (Button)findViewById(R.id.button_2); hButton.setOnClickListener(new View.OnClickListener() { @Override public void onClick(View v) { RecyclerActivity.StartRecyclerActivity(MainActivity.this,RecyclerActivity.REC_HORIZONTAL); } }); } }
|
这里我们看到在 MainActivity 启动 RecyclerActivity 时,调用的是定义在 RecyclerActivity 中的 StartRecyclerActivity() 方法, 需要传递两个参数一个是上下文, 另一个参数是滚动方向的常量数值。这是我们在学习 Activity(活动) 那篇文章中积累的小技巧。这样做的好处就是开发 RecyclerActivity 界面的人不需要去 MainActivity 中查看传递的参数是什么及参数的key是什么。
运行程序,点击按钮分别进入 RecyclerView纵向滑动 和 RecyclerView横向滑动 的活动中。这就是 RecyclerView 的基本用法。
在 RecyclerView 中的 setLayoutManager() 除了,可以可以设置 LinearLayoutManager,还给我们提供了 GridLayoutManager 和 StaggeredGridLayoutManager 这两种内置的布局排列方式。GridLayoutManager 可以用于实现网格布局,StaggeredGridLayoutManager 可以用于实现瀑布流布局,这里我们就来实现一下这个炫酷的瀑布流效果。
RecyclerView实现瀑布流效果
新建一个活动 StaggeredActivity,并且在其布局文件中添加 RecyclerView 控件。这一步我就不演示了…
第一步,创建子项布局
我们新建一个子项布局 staggered_item_style2.xml 并将上述子项布局内容拷贝过来修改如下:
1 2 3 4 5 6 7 8 9 10 11 12 13 14 15 16 17
| <?xml version="1.0" encoding="utf-8"?> <LinearLayout xmlns:android="http://schemas.android.com/apk/res/android" android:layout_width="match_parent" android:layout_height="wrap_content" android:orientation="vertical" android:layout_margin="5dp"> <ImageView android:id="@+id/rec_style2_img" android:layout_width="wrap_content" android:layout_height="wrap_content" /> <TextView android:id="@+id/rec_style2_text" android:layout_width="wrap_content" android:layout_height="wrap_content" android:layout_gravity="left" android:layout_marginTop="10dp"/> </LinearLayout>
|
这里就是瀑布流的 RecyclerView 的子项布局。
数据模型我们继续使用 DataModel 就可以了。
第二步,创建瀑布流数据适配器
新建一个适配器 DataModelAdapter02, 将上述 DataModelAdapter01 中内容拷贝并如下修改:
1 2 3 4 5 6 7 8 9 10 11 12 13 14 15 16 17 18 19 20 21 22 23 24 25 26 27 28 29 30 31 32 33 34 35 36 37 38 39 40 41 42 43 44 45 46 47 48
| package com.recyclerviewtest.chuliangliang.recyclerviewtest; import android.support.v7.widget.RecyclerView; import android.view.LayoutInflater; import android.view.View; import android.view.ViewGroup; import android.widget.ImageView; import android.widget.TextView; import android.widget.Toast; import java.util.List; * Created by chuliangliang on 2017/5/25. */ public class DataModelAdapter02 extends RecyclerView.Adapter<DataModelAdapter02.ViewHolder_style2> { private List<DataModel> mDataArray2; static class ViewHolder_style2 extends RecyclerView.ViewHolder { View containnerView; ImageView imageView; TextView textView; public ViewHolder_style2(View view) { super(view); containnerView = view; textView = (TextView) view.findViewById(R.id.rec_style2_text); imageView = (ImageView) view.findViewById(R.id.rec_style2_img); } } public DataModelAdapter02(List<DataModel> dataList) { mDataArray2 = dataList; } @Override public DataModelAdapter02.ViewHolder_style2 onCreateViewHolder(ViewGroup parent, int viewType) { View view = LayoutInflater.from(parent.getContext()).inflate(R.layout.staggered_item_style2,parent,false); final DataModelAdapter02.ViewHolder_style2 vHolder = new DataModelAdapter02.ViewHolder_style2(view); return vHolder; } @Override public void onBindViewHolder(DataModelAdapter02.ViewHolder_style2 holder, int position) { DataModel dataModel = mDataArray2.get(position); holder.imageView.setImageResource(dataModel.getPid()); holder.textView.setText(dataModel.getText()); } @Override public int getItemCount() { return mDataArray2.size(); } }
|
在这适配中,我只修改布局先关的代码与上面的用法一致。
第三步,修改StaggeredActivity中代码
1 2 3 4 5 6 7 8 9 10 11 12 13 14 15 16 17 18 19 20 21 22 23 24 25 26 27 28 29 30 31 32 33 34 35 36 37 38 39 40 41 42 43 44 45 46 47 48 49 50 51 52 53 54 55
| package com.recyclerviewtest.chuliangliang.recyclerviewtest; import android.support.v7.app.AppCompatActivity; import android.os.Bundle; import android.support.v7.widget.LinearLayoutManager; import android.support.v7.widget.RecyclerView; import android.support.v7.widget.StaggeredGridLayoutManager; import java.util.ArrayList; import java.util.List; import java.util.Random; public class StaggeredActivity extends AppCompatActivity { private List<DataModel> mDatalist = new ArrayList<DataModel>(); @Override protected void onCreate(Bundle savedInstanceState) { super.onCreate(savedInstanceState); setContentView(R.layout.activity_staggered); initData(); RecyclerView recyclerView = (RecyclerView)findViewById(R.id.RecyclerV_2); StaggeredGridLayoutManager staggeredGridLayoutManager = new StaggeredGridLayoutManager(3,StaggeredGridLayoutManager.VERTICAL); recyclerView.setLayoutManager(staggeredGridLayoutManager); DataModelAdapter02 adapter02 = new DataModelAdapter02(mDatalist); recyclerView.setAdapter(adapter02); } public void initData() { for (int i = 0; i< 4; i ++) { DataModel dataModel_cm = new DataModel("草莓-"+getRanddomLengthName("jadjljdljd草莓"),R.drawable.cm); mDatalist.add(dataModel_cm); DataModel dataModel_cz = new DataModel("橙子-"+getRanddomLengthName("hksajdakh橙子"),R.drawable.cz); mDatalist.add(dataModel_cz); DataModel dataModel_pg = new DataModel("苹果-"+getRanddomLengthName("啊回到拉萨是苹果"),R.drawable.pg); mDatalist.add(dataModel_pg); DataModel dataModel_pt = new DataModel("葡萄-"+getRanddomLengthName("hdkashdk葡萄"),R.drawable.pt); mDatalist.add(dataModel_pt); DataModel dataModel_xj = new DataModel("香蕉-"+getRanddomLengthName("1234567876543香蕉"),R.drawable.xj); mDatalist.add(dataModel_xj); DataModel dataModel_yt = new DataModel("樱桃-"+getRanddomLengthName("qwertdsfdsaf樱桃"),R.drawable.yt); mDatalist.add(dataModel_yt); } } private String getRanddomLengthName(String name) { Random random = new Random(); int length = random.nextInt(20) + 1; StringBuilder builder = new StringBuilder(); for ( int i = 0; i < length; i ++) { builder.append(name); } return builder.toString(); } }
|
观察发现我们只是修改了 RecyclerView 的 setLayoutManager() 及其子项和适配器的UI布局,因为瀑布流的效果是每个子项的存在差距,我们这里通过调用 getRanddomLengthName() 随机创建个字符串,让其达到这个效果。运行程序,就会进入这个酷炫的瀑布流效果了。
第四步,RecyclerView点击事件
RecyclerView 与 ListView 不只是UI展示上一样,而且也同样可以接收点击事件,我们给上面的瀑布流上添加点击事件。
我们将适配器 DataModelAdapter02 中的 onCreateViewHolder() 方法如下修改
1 2 3 4 5 6 7 8 9 10 11 12 13 14 15 16 17 18 19 20 21 22 23 24 25 26
| @Override public DataModelAdapter02.ViewHolder_style2 onCreateViewHolder(ViewGroup parent, int viewType) { View view = LayoutInflater.from(parent.getContext()).inflate(R.layout.staggered_item_style2,parent,false); final DataModelAdapter02.ViewHolder_style2 vHolder = new DataModelAdapter02.ViewHolder_style2(view); vHolder.containnerView.setOnClickListener(new View.OnClickListener() { @Override public void onClick(View v) { int position = vHolder.getAdapterPosition(); DataModel dataModel = mDataArray2.get(position); Toast.makeText(v.getContext(), "点击子选项了-点击的内容为"+dataModel.getText(), Toast.LENGTH_SHORT).show(); } }); vHolder.imageView.setOnClickListener(new View.OnClickListener() { @Override public void onClick(View v) { int position = vHolder.getAdapterPosition(); DataModel dataModel = mDataArray2.get(position); Toast.makeText(v.getContext(), "点击图片了-点击的内容为"+dataModel.getText(), Toast.LENGTH_SHORT).show(); } }); return vHolder; }
|
通过上述代码我们为瀑布流添加两个点击事件, 一个是点击整个所有的子项布局上的点击事件,一个是点击子项布局的中的图片控件响应的的点击事件。分别在这两个事件中输出一句话。运行程序,瀑布流就可以接收点击事件了。
到此为止,我们Android中的 UI控件及布局 就基本全部学完了,我们要用这几天所学的东西,实现一个精美的聊天界面,来检验一下这几天的学习成果。
不过在这之前我们还要学习一下 Android Studio 中如何制作 .9图。
.9图的制作
在Android中.9图是 Andriod app 开发里一种特殊的图片形式,文件的扩展名为:.9.png,9patch 图片的作用就是在图片拉伸的时候保证其不会失真。所以我们使用 .9图片,让图片在指定的位置拉伸和在指定的位置显示内容,这样图片的边边角角就不会出现失真了。
那么如何制作.9图呢? 制作.9图的方法有很多中, 通过 ps 等一些工具就可以制作,其实Android Studio中就自带.9图制作的工具。我们就来看看如何使用Android Studio制作.9图。
1.准备一张png图片

这是一张普通的 png图片, 如果不使用 .9图,直接展示在设备上,就会出现不同的拉伸情况导致图片变形,所以我们将其处理成 .9 图。
2.启动 Android Studio .9图制作工具
将这个图片放入项目 “app/drawable/my_chat.png” 路径下,然后在这个图片上右键–> Create 9-Patch file,在弹出的对话框中输入要保存的.9图的名字,点击OK,然后在项目中找到这个.9图直接打开,就可以编辑这个图片了。如图
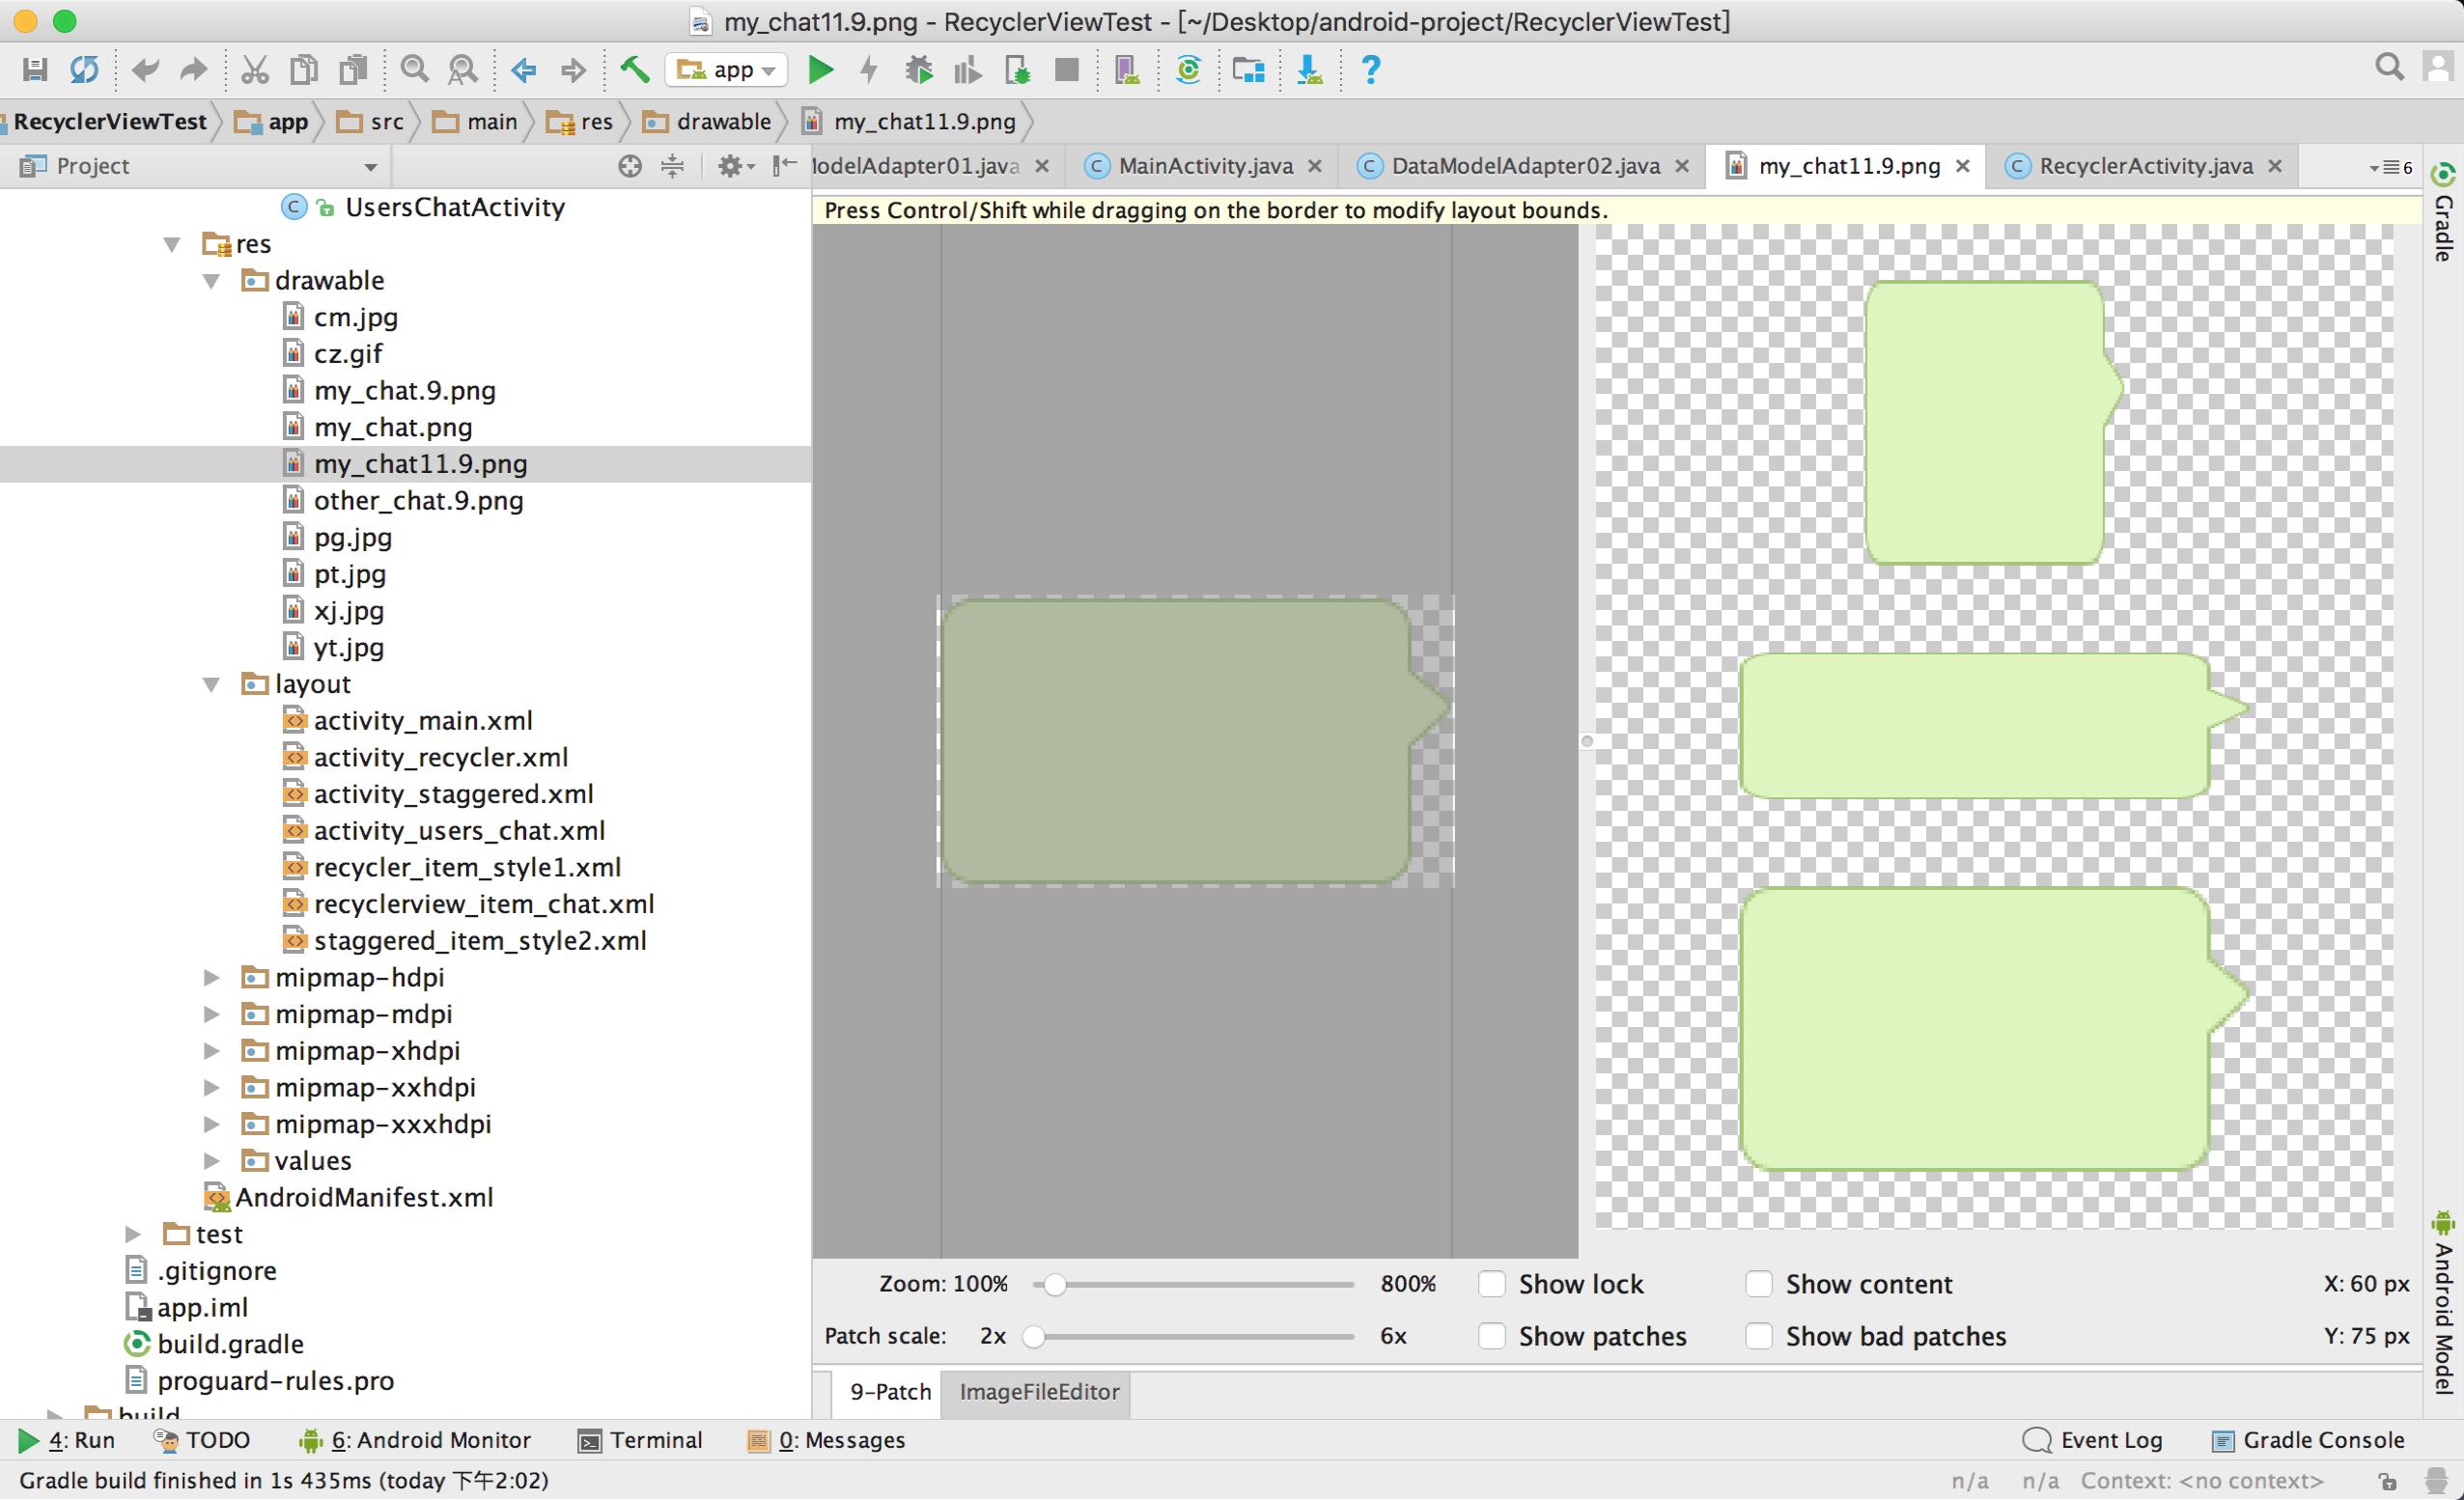
绘制之前先来说一下.9图片的四条黑边的意义,每条黑边的意义都不一样
顶部:在水平拉伸的时候,保持其他位置不动,只在这个点的区域做无限的延伸(拷贝)
左边:在竖直拉伸的时候,保持其他位置不动,只在这个点的区域做无限的延伸(拷贝)
底部:在水平拉伸的时候,指定图片里的内容显示的区域
右边:在竖直拉伸的时候,指定图片里的内容显示的区域
如图

上图右侧预览区域我们可以看到图片经过设置后的拉伸效果,我们将 Show content 选中预览区域的灰色部分内容显示的区域。
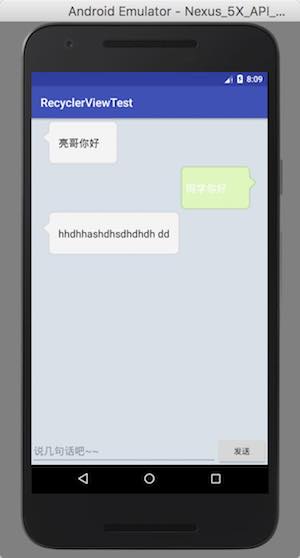
牛刀小试—聊天界面的实现
用过 微信或QQ 的都知道,聊天界面UI布局大致为:很多天数据可以上下滚动,接收到消息靠左侧显示,自己发送的消息在右侧显示,底部还有一个输入框及发送按钮。
1.创建聊天界面的活动及RecyclerView
创建一个活动 sersChatActivity, 并在其布局文件中添加 RecyclerView 控件,代码如下:
1 2 3 4 5 6 7 8 9 10 11 12 13 14 15 16 17 18 19 20 21 22 23 24 25 26 27 28 29 30 31 32 33
| <?xml version="1.0" encoding="utf-8"?> <LinearLayout android:id="@+id/main_root" xmlns:android="http://schemas.android.com/apk/res/android" android:layout_width="match_parent" android:layout_height="match_parent" android:background="#d8e0e8" android:orientation="vertical"> <android.support.v7.widget.RecyclerView android:id="@+id/chat_recyclerView" android:layout_width="match_parent" android:layout_height="0dp" android:layout_weight="1"> </android.support.v7.widget.RecyclerView> <LinearLayout android:layout_width="match_parent" android:layout_height="wrap_content"> <EditText android:id="@+id/editView_input" android:layout_width="0dp" android:layout_weight="1" android:layout_height="match_parent" android:layout_marginBottom="0dp" android:hint="说几句话吧~~" android:maxLines="2" /> <Button android:id="@+id/button_Send" android:layout_width="wrap_content" android:layout_height="wrap_content" android:text="发送" android:textAllCaps="false"/> </LinearLayout> </LinearLayout>
|
这里我们使用的嵌套方式的布局,我们在之前介绍布局的时候提到过,怎么样?是不是很简单。
活动展示的界面有了,那么我们接下来创建 RecyclerView 的子项布局(OC中的 UITableViewCell)。
2.创建子项布局
新建不布局文件 recyclerview_item_chat.xml, 添加展示数据的控件, 代码如下:
1 2 3 4 5 6 7 8 9 10 11 12 13 14 15 16 17 18 19 20 21 22 23 24 25 26 27 28 29 30 31 32 33 34 35 36 37 38 39 40 41 42 43 44
| <?xml version="1.0" encoding="utf-8"?> <LinearLayout xmlns:android="http://schemas.android.com/apk/res/android" android:orientation="vertical" android:layout_width="match_parent" android:layout_height="wrap_content"> //用来展示接收的消息 <LinearLayout android:id="@+id/chat_layout_left" android:layout_width="wrap_content" android:layout_height="wrap_content" android:layout_gravity="left" android:layout_marginLeft="20dp" android:layout_marginRight="10dp" android:layout_marginTop="5dp" android:background="@drawable/other_chat"> <TextView android:id="@+id/chat_left_msg" android:layout_width="wrap_content" android:layout_height="wrap_content" android:layout_gravity="center" android:layout_margin="10dp" android:textSize="18sp" android:textColor="#000"/> </LinearLayout> //用来展示自己发送的消息 <LinearLayout android:id="@+id/chat_layout_right" android:layout_width="wrap_content" android:layout_height="wrap_content" android:layout_gravity="right" android:layout_marginLeft="10dp" android:layout_marginRight="20dp" android:layout_marginTop="5dp" android:background="@drawable/my_chat"> <TextView android:id="@+id/chat_right_msg" android:layout_width="wrap_content" android:layout_height="wrap_content" android:layout_gravity="center" android:textColor="#fff" android:textSize="18sp" android:layout_marginTop="0dp"/> </LinearLayout> </LinearLayout>
|
上面的代码相信大家很容易看懂,这里就不解释了。如果看不懂,请查看上几篇文章。
展示的布局及活动都有了, 现在我们创建个消息模型。
3.创建消息模型
创建model类用来保存聊天消息,起名为 MessageModel。
代码示例:
1 2 3 4 5 6 7 8 9 10 11 12 13 14 15 16 17 18 19 20 21
| package com.recyclerviewtest.chuliangliang.recyclerviewtest; * Created by chuliangliang on 2017/5/26. */ public class MessageModel { public static final int MSG_TYPE_RECEIVED = 0; public static final int MSG_TYPE_SEND = 1; private int type; private String contentText; public MessageModel(String text,int type) { this.contentText = text; this.type = type; } public int getType() { return type; } public String getContentText() { return contentText; } }
|
这个模型类很简单, 包含两个属性,一个是消息内容,一个是消息来源,真实的聊天数据模型肯定会比这个要多,我们这里只要使用这两个就可以满足基本的需求了。
有了这些还是不可以实现这个聊天界面的功能的,我们还需要一个适配器作为数据模型与UI之间的桥梁。
4.创建适配器
创建适配器 MessageAdapter 继承自 RecyclerView.Adapter 并将泛型指定为 其内部类 MessageAdapter.MsgViewHolder, 代码如下:
1 2 3 4 5 6 7 8 9 10 11 12 13 14 15 16 17 18 19 20 21 22 23 24 25 26 27 28 29 30 31 32 33 34 35 36 37 38 39 40 41 42 43 44 45 46 47 48 49 50 51 52 53 54 55 56 57 58 59 60 61 62 63 64
| package com.recyclerviewtest.chuliangliang.recyclerviewtest; import android.support.v7.widget.RecyclerView; import android.view.LayoutInflater; import android.view.View; import android.view.ViewGroup; import android.widget.LinearLayout; import android.widget.TextView; import java.util.List; * Created by chuliangliang on 2017/5/26. */ public class MessageAdapter extends RecyclerView.Adapter <MessageAdapter.MsgViewHolder>{ private List<MessageModel> mMsgList; static class MsgViewHolder extends RecyclerView.ViewHolder { public TextView leftTextView; public LinearLayout leftLayout; public TextView rightTextView; public LinearLayout rightLayout; public View containerView; public MsgViewHolder(View view) { super(view); this.containerView = view; this.leftLayout = (LinearLayout)view.findViewById(R.id.chat_layout_left); this.leftTextView = (TextView)view.findViewById(R.id.chat_left_msg); this.rightTextView = (TextView)view.findViewById(R.id.chat_right_msg); this.rightLayout = (LinearLayout)view.findViewById(R.id.chat_layout_right); } } public MessageAdapter(List<MessageModel> msgList) { this.mMsgList = msgList; } @Override public MsgViewHolder onCreateViewHolder(ViewGroup parent, int viewType) { View view = LayoutInflater.from(parent.getContext()).inflate(R.layout.recyclerview_item_chat,parent,false); return new MsgViewHolder(view); } @Override public void onBindViewHolder(MsgViewHolder holder, int position) { MessageModel messageModel = mMsgList.get(position); if (messageModel.getType() == MessageModel.MSG_TYPE_RECEIVED) { holder.leftLayout.setVisibility(View.VISIBLE); holder.rightLayout.setVisibility(View.GONE); holder.leftTextView.setText(messageModel.getContentText()); }else if (messageModel.getType() == MessageModel.MSG_TYPE_SEND) { holder.leftLayout.setVisibility(View.GONE); holder.rightLayout.setVisibility(View.VISIBLE); holder.rightTextView.setText(messageModel.getContentText()); } } @Override public int getItemCount() { return mMsgList.size(); } }
|
我们在适配器中按照不同的消息类型展示不同的UI控件。我们回到活动中,完成最后一步。
5.在活动中完成最后一步
代码如下:
1 2 3 4 5 6 7 8 9 10 11 12 13 14 15 16 17 18 19 20 21 22 23 24 25 26 27 28 29 30 31 32 33 34 35 36 37 38 39 40 41 42 43 44 45 46 47 48 49 50 51 52 53 54 55 56 57 58 59 60 61 62 63 64 65 66 67 68 69 70 71
| package com.recyclerviewtest.chuliangliang.recyclerviewtest; import android.content.pm.ProviderInfo; import android.support.v7.app.AppCompatActivity; import android.os.Bundle; import android.support.v7.widget.LinearLayoutManager; import android.support.v7.widget.RecyclerView; import android.view.View; import android.widget.Button; import android.widget.EditText; import java.util.ArrayList; import java.util.List; public class UsersChatActivity extends AppCompatActivity { private List<MessageModel>msgArray = new ArrayList<MessageModel>(); private EditText inputView; private Button sendButton; private RecyclerView msgRecyclerView; private MessageAdapter mAdapter; private void loadSubViews() { this.inputView = (EditText) findViewById(R.id.editView_input); this.sendButton = (Button) findViewById(R.id.button_Send); this.msgRecyclerView = (RecyclerView) findViewById(R.id.chat_recyclerView); } @Override protected void onCreate(Bundle savedInstanceState) { super.onCreate(savedInstanceState); setContentView(R.layout.activity_users_chat); this.loadSubViews(); this.initMessageData(); LinearLayoutManager linearLayoutManager = new LinearLayoutManager(this); this.msgRecyclerView.setLayoutManager(linearLayoutManager); this.mAdapter = new MessageAdapter(this.msgArray); this.msgRecyclerView.setAdapter(this.mAdapter); } private void initMessageData() { MessageModel messageModel1 = new MessageModel("亮哥你好",MessageModel.MSG_TYPE_RECEIVED); this.msgArray.add(messageModel1); MessageModel messageModel2 = new MessageModel("同学你好",MessageModel.MSG_TYPE_SEND); this.msgArray.add(messageModel2); MessageModel messageModel3 = new MessageModel("hhdhhashdhsdhdhdh dd",MessageModel.MSG_TYPE_RECEIVED); this.msgArray.add(messageModel3); this.sendButton.setOnClickListener(new View.OnClickListener() { @Override public void onClick(View v) { String inputText = inputView.getText().toString(); if (!inputText.equals("")) { MessageModel msg = new MessageModel(inputText,MessageModel.MSG_TYPE_SEND); msgArray.add(msg); mAdapter.notifyItemInserted(msgArray.size()-1); msgRecyclerView.scrollToPosition(msgArray.size()-1); inputView.setText(""); } } }); } }
|
运行程序,效果如下:
总结
到今天为止Android中的UI部分就基本全部学习完毕,未来一段时间,对于Android的学习笔记记录的时间间隔可能会稍微长一点,在学习Android的这段时间,有时心情很烦躁,也很着急,正所谓路是一步一步走的,饭是一口一口吃的,不要着急去干一件大事,认认真真干好身边的每一件小事,很多小事放在一起就是一件了不起的大事。
尽小者大,慎微者著。—— 《资治通鉴》
本文使用的Demo 下载

